Our website has moved! Redirecting to RecipeStudio.com...
If this does not work, please click here.

Baked Omelet (Drachona)

Sunday, April 22, 2012

I loved baked omelet that was served in Russian canteens, the common lunch place of the Soviet era. It was one of very few eatable and even enjoyable dishes among an array of unattractive food. They used to make it on huge baking trays and cut off the portions with a special spatula. It was browned on the top and was  not losing the volume once on a plate, as usually happens with top-stove omelets. We called it omelet, and at that time I didn't know it had a special name drachona.  The name probably comes from either Ukranian or Belorussian cuisines. That's what my linguistic intuition tells me since I failed to find any proof of origin for this word. The research shows that basic drachona is made of eggs, flour and milk, it is oven-baked. But there are also numerous variations when it is made with wheat or millet, potatoes and even cheese.
When I found the recipe online and decided to cook, I forgot to separate eggs and my drachona, though deliciously puffy right out of the oven, quickly and disappointingly decreased in volume on our plates. My second attempt was successful (I tried to wake up completely and concentrate :): drachona increased in volume nicely and did not sink - it was holding until the last bite. The texture was light and delicate and would fit for a dessert pudding, but it was not. It was our unusual and very pleasant Sunday breakfast.

The recipe was adapted from RusCuisine.com.

What you need:
4 large eggs, separated
1/2 cup milk
2 Tbsp sour cream
2 Tbsp flour
1/4 tsp Kosher salt
1 Tbsp butter + more for serving
Chopped parsley

Time: 50 minutes
Feeds 2-4 people

Method:
Set the oven at 325 F then start prep work.
1. Beat egg yolks with salt and sour cream.
2. Mix flour and milk until even.
3. Beat egg whites until soft peaks form.
4. Mix well 1 & 2, then fold in the whites, don't beat after that.
5. Grease the baking form with 1 Tbsp butter.
6. Pour in the mixture and place in the heated oven.
7. Bake for about 30-35 minutes or until set. You can broil it a little if you want if you want it browned.
Egg yolks and whites separated in two layers while baking,
 but it didn't change the taste to the worse. 
Serve drachona immediately with more butter and chopped parsley.

Notes:
I don't get tired to repeat: people, please use organic eggs from free range chickens - it makes the whole difference in your omelets. Please support your local farmers that sell fresh clean eggs!
Blue eggs from a nearby farm - the base for my drachona. So good... :)
Experiment with your baked omelet by adding more spices, bacon, green onions and other things your imagination will whisper.

Hot Non-Alcoholic Fruit Punch

Tuesday, April 17, 2012

As soon as I came to Zürich two weeks ago the weather turned foul and hasn't even once cleared up (until today, yay!). It was also cold, and being optimistic about spring I didn't pack anything warm enough.

Under these circumstances one can't go on drinking mulled wine every day (next fall I promise to post our amazing mulled wine recipe and you will understand why it may be tempting). This spiced hot fruit punch is a non-alcoholic alternative that warms the body and soul just as well. The recipe is a hybrid between our fragrant and sophisticated mulled wine recipe and Russian kompot, a dead simple boiled fruit drink I enjoyed growing up.

If it's still cold around your part of the world, this recipe is for you. And if not, you can also serve this cold.

What you need:
4 cups water
2-3 Tbsp sugar
1 Tbsp strawberry jam (optional)
1 apple
8 dried apricots
3 Tea bags of hibiscus tea
1 very fragrant fresh clementine
two pinches of mulling spices (choose any that you like, I just had a pre-packaged mix in my cuppoard)

How to do it:
Chop the bright orange apricots in half and drop them into a pot of water. Add sugar and hibiscus tea bags (careful to leave only he heat resistant parts of the teabags) and turn the heat on. Make sure the water boils only very gently - no wild gurgling bubbles, please.

After a minute or two of boiling, the tea bags will have released all of their crimson color. Fish them out and discard. We would not want them to break and let loose their contents. Add one pinch of mulling spices and cover.

After 20 minutes of gentle boiling, add chopped apple and the second pinch of spices. Stir in strawberry jam and cover.

When the apple chunks are cooked through (5-10 minutes), remove from heat. Add clementine zest and juice to the hot (but not boiling!) punch right before serving.

Enjoy the drink and the fruit and stay warm!

The art of it:
I used dried apricots and an apple, because my grandma had used them in winter when no fresh fruit was available. To me this combination tastes of home and childhood. Maybe for you something else will do the trick: raisins, plums, pears, you name it! Just be sure to take into account how long it takes to cook different fruits.

The type of mulling spice is up to you. It gives this drink a wintery feeling, while the clementine zest throws in a bit of freshness and feistiness. After all, Spring is coming.

Inspiration:
This weather will inspire anyone to warm up:

Though some of actually looks quite nice:


And to top it off, I actually have a bed now, and a table, and curtains (but still no internet, alas), unlike the last time I made a post!

Frikadellen Soup

Monday, April 16, 2012


My German Nanny was not a good cook, but it was she who introduced this simple Fricadellen soup recipe to our family. Too little to help, I used to hang around kitchen looking how she was grinding, peeling and boiling. "What's cooking?" I would ask. "Frikadellen soup", Nanny would grouch, she didn't like me in the kitchen. And suddenly I felt so terribly hungry, and time started to crawl so slowly until the soup was finally done...

Since then (long time ago it was :) it has become one of our frequently cooked and loved soups. Traditional German Fricadellen are relatives of Russian cotelettes and meatballs, both of which use the same ingredients and have similar form - but not cooking style. In today's recipe tiny Frikadellen are prepared in a different way. This soup is a healthier way of cooking ground meat, since it is boiled not fried.

The soup is simple, and the only special skill you need is rolling small meatballs out of ground meat. It takes some practice, but what doesn't? I think slicing and dicing takes more skill than this. I used beef, but other meats can be used with the same result, but it is best if the meat was not very lean - it makes the meatballs more delicate. Actually most of this fat will boil out and can be skimmed.

This soup is always a pleasure to eat, and everybody likes it (the reward every home chef needs).
What you need:
3 qts filtered water
1/2 lb ground meat (beef, pork, lamb, turkey, chicken or their combinations)
1 small egg
1 medium yellow onion, peeled
2 medium potatoes (starchy type), peeled and cubed (1/2" cubes)
1 tsp Kosher salt, divided
1/4 tsp ground black pepper
Black pepper corns
2 Tbsp flour
1 bay leaf
Chopped greens
Time: about 1 hour
Feeds 4-6  people

Method:
1. Put a pot with water on high heat.
2. Cut a small portion of onion and grate it in a bowl. Add ground meat with 1/4 tsp salt, ground pepper, and 1 small egg (if it's a large egg the meat mass can become too soft to form meatballs; if it happens, add 1 tsp flour). Mix with a spoon or your hand until well incorporated and not sticking to the bowl.
3. With a tea spoon scoop small portions of meat on a flat plate. Roll each portion between your palms to form a small meatball about 1" diameter. Use slightly wet hands to do this, if meat is sticky.
4. Roll each ball in flour, and shake off the excess by rolling it between palms. Working swiftly, repeat with all the remaining meatballs. Drop meatballs into boiling water (it should be boiling at this point). Reduce heat to medium, remove the foam from the surface. Slightly shake the pot to avoid the sticking of meatballs to the bottom. Boil for a minute and let the meat harden.
5. Add potatoes, 3/4 tsp salt (or less if you prefer less salty food), and black pepper corns, reduce heat to simmer.
6. While soup is cooking, chop the remaining onion and saute it in 1 Tbsp oil until nicely caramelized.
7. When potatoes are almost ready, add onion and bay leaf to the soup, taste for salt (you might use less or more of what is in the recipe). Keep in mind that potatoes absorb a lot of salt, so soup might seem salty, but at the end it will need some adjustment. Simmer until potatoes are completely done.

Serve with chopped greens of your choice. Enjoy!

Notes:
This soup can be called kid-friendly. As a child, I loved Fricadellen soup, so did Masha when she was little. She still loves it and has been asking me for a long time to post it (How long can you procrastinate with this recipe?.. :)
This is a basic recipe that you could "embellish" to your taste and mood of the day: add leek, carrot, sweet pepper, garlic, and what not.

Fresh Beet Smoothie

Thursday, April 12, 2012

Beet Smoothie?.. If somebody told me about it a few years ago, I would be very skeptical. Once I tried it though, it became one of my preferred smoothies any time of the year. It is very timely after Easter when you eat a lot of high-calorie viands and your body needs a break. Fresh beet smoothie is unexpectedly tasty and offers many benefits to your health: not only it nourishes, it also cleanses your body, making life better and your senses sharper. It makes you a happier person. A perfect quick breakfast, it gives your day an energetic start.
I used to make fresh beet salad once in a while, but real love to fresh beets came to me when I stumbled upon Mini Beet Protocol among many readings on natural healing methods. Taken regularly and persistently, fresh beets and beet juice can rid you of many ailments. It will make you feel healthy and light and ready to conquer. One warning: you have to take some caution starting with fresh beets since it is a very powerful plant. Eaten alone, beets might not be so pleasant, can irritate your throat and even make you feel nauseous.  It's better to mix beets with other fresh vegetables and fruit, and start slow, with small portions. The basic combination of beet, carrot and apple works best. Somehow carrots and apples neutralize and soften the effects of fresh beets. Together they make a delicious and healthy drink or a refreshing dessert.

What you need:
1 small beet, about 2" diameter, peeled and coarsely cut
(or use part of a bigger beet)
1 small carrot, peeled and coarsely cut
(I used 1/2 of a bigger carrot)
1 medium green apple, quartered and seeded
1 tsp honey (optional)
3/4 cup filtered water

Equipment: blender
Time: 10 minutes (or less if you peel fast)

Method:
I prefer a thicker smoothie "dessert"
It is so simple: just throw everything in a blender, blend on high for 1-2 minutes until it all foams. If you feel it's too thick, add a little more water.
Pour in a glass, enjoy it's wonderful color, and drink up your fresh beet smoothie thinking that good stuff is entering your precious body.

Notes:
Whenever possible use organic beets, you don't want to spoil good effects of beets with bad chemicals.
To incorporate fresh beets and beet greens in your soups, see our recipe Beet Smoothie Soup.

Beet juice diluted with water using 1:1 ratio makes an effective medicine for running nose when you have a cold. Squeeze a couple of drops into each nostril a few times a day. It will sting, but is worth the suffering.

Judas Buns for Easter

Friday, April 6, 2012

In Czech Republic Judas Buns are served for Easter and, following the most popular legend, symbolize the rope on which Judas hang himself after he betrayed Christ (the traitor had some remnants of conscience in him after all).
I have been thinking about baking these buns for a few years now. I used to make them long time ago when I incidentally acquired a Czech Cookbook in the biggest bookstore of the city of Novosibirsk, Siberia. The book was an odd item in the store, but a great find for me. There were two benefits: it had a lot of Czech recipes (as a recent traveler to then Czechoslovakia I was interested in Czech cuisine) and it was written in English (that was kinda hobby of mine at that time). I left the book behind when we parted with gloomy Russia and moved to the US. Luckily, on the last visit to our motherland I found this book among others and lovingly brought it back. The book is beautifully published, but recipes lack detailed instructions and rely on a person's experience. But that's OK with me.:) Actually it makes the process unpredictable and more exciting.
I took the recipe from this book and tweaked it a little. There is only 1 (!) tea spoon of sugar in the dough, the rest of sweetness comes from honey. Despite late evening, Alex ate three buns in a row, rolling his eyes with pleasure. I was also seduced to eat one... OK - two smaller ones. :) The buns are moderately sweet,  have delicate slightly chewy texture (in a good way) and a rich taste of a fancy pastry, with a tiny lemony note. They can certainly be baked anytime and make a beautiful breakfast or a festive treat.
What you need:
2.75 cups flour, sifted + flour to work with dough
2.5 cups milk
3 egg yolks
100 g (7 Tbsp) butter, melted + butter for brushing
100 g (1/3 cup) honey + honey for brushing
1 tsp sugar
3 tsp instant dry yeast
1/8 tsp of salt
2-3 tsp lemon juice
1 lemon zest
Total time about 3 hours
Yields about 20 buns depending on form and size

Method:
1. Warm up milk to lukewarm in an enameled or stainless steel pot.
2. Mix yeast in 1/2 cup of this milk along with 1 tsp sugar and 1 Tbsp flour, set aside to foam.
3. Warm up together butter and honey until butter is melted.
4. Cream together egg yolks, butter and honey - stir for 5 minutes, add lemon zest.
5. Add  eggs with butter and honey, salt and yeast (when foamy)  to milk, stir well.
6. Warm up the mixture if necessary on very low heat. Add flour to milk mixture, stir with a wooden spoon, then transfer to the working surface and continue to knead with your hands until you have soft dough that doesn't stick to your hands.
7. Transfer dough to the pot, cover, and put in a warm place to rise. It will take about 1 hour depending on the quality of the yeast and the temperature in the room.
8. After the first rise, punch the dough down, and let rise some for the second time for about 20 minutes.
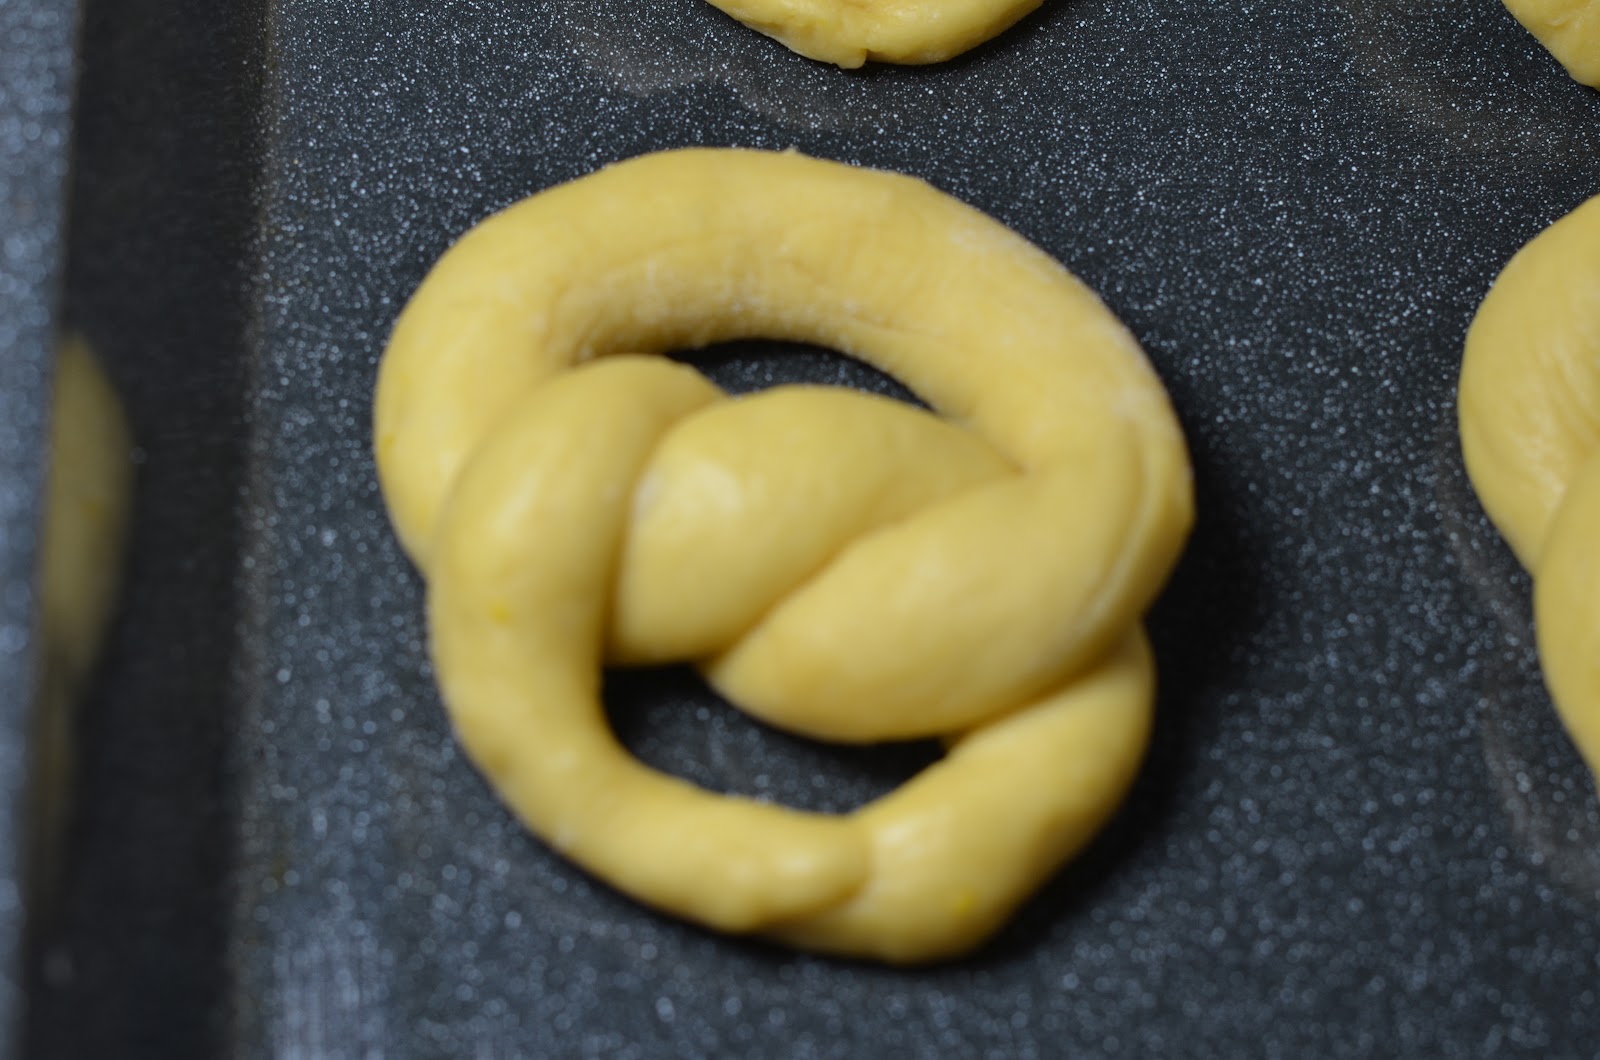
9. Cut the dough into pieces, about 1 oz each. Roll them out into 1/2" thick strings. Then improvise to your liking: twist them in half or in pairs in a  rope-like manner, braid them, etc. Make them look like... ropes.


10. Place buns on a buttered baking sheet, leaving enough space between them to expand. Loosely cover with plastic wrap, put in a warm place to rise for the third time, about 30 minutes.
Again, the rising time depends on your yeast and the temperature in the room, it should be no less than 75 F. If it is rather cool in your kitchen, use the slightly warmed oven to rise your dough. Remember that temperature higher than 130 F will harm the yeast.
11. Before baking, gently brush the buns with warm melted butter.
12. Bake at 395 F for 15 minutes until golden.

While baking:
-do not open the oven first 10 minutes until the dough is set;
-do not jump;
-do not slam doors;
-do not yell.
All of the above has a disastrous impact on the texture and overall quality of baked dough: it may sink before it is baked and shaped by the heat of the oven.

13. Stir 1 Tbsp honey with lemon juice so that it becomes liquidy and brush ready buns while they are still hot.
Ready!
Serve warm or cooled, with milk, tea, and additional honey.


Notes:
It is important to give the yeast dough time to rise well, otherwise what you will get is a tough bun or roll or whatever you bake, with dense texture and a taste of yeast -  versus an airy and light texture of a well-risen dough. As aunt Shura taught me, the yeast dough usually requires three risings to be "ripe" and ready to bake. I follow this advice most of the time with good results.

These buns do stale fast. To revive them, just wrap in a paper towel and microwave for 15 seconds before eating - they will be almost as good as freshly baked.

Enjoy your Judas Buns on Easter or any day you feel a call for baking. Happy Easter 2012!

Empty Apartment Sauce

Friday, April 06, 2012

Sorry, guys, all photos were taken from my phone. I photoshopped them to look about as dazed as me :)

Tonight I cooked dinner for the first time in my blissfully empty Swiss kitchen. As the name of this post suggests, the kitchen is inside my new and almost entirely empty apartment, just about a 15 minute walk away from Zurich's local mountain Uetliberg. The apartment is empty, because I only brought a suitcase with me from New York, but in the suitcase I brought a loyal stainless steel pan!

Next time you are making steak when dead tired and wolf hungry after running around an unfamiliar city, trying to speak a foreign language with strangers, and sleeping on the floor because you don't have a bed, consider making this simple sauce to fortify your spirits. It's rich and satisfying and only takes two main ingredients - onions and sour cream.
What you need:
Meat and seasonings for your steak
1.5 Tbsp sour cream per person
1/2 small onion per person
oregano or another herb of choice (optional)

Making the sauce:
Sear your steak in a little oil in a stainless steel pan, as you normally would. Stainless steel pan grips the frying meat more tightly than Teflon and doesn't quite want to let go, so when you remove the meat dark brown residue remains as its footprint. This is called fond (see Wiki) and is the foundation of the famous French pan sauces.

When the steak is ready, remove it from the pan and set aside. Lower the heat and saute chopped onions in the same oil and same dirty pan until caramelized. Optionally add your chopped herb. Then, pour in just enough water so that not all of it evaporates at once, and scrape the bottom of the pan with a wooden spoon until all of the fond dissolves in the water (deglazing as this is called is typically done with more interesting liquids like wine or broth, none of which could be found in my empty pantry).

Salt generously and let the onions simmer for a minute until the sauce is nearly as thick as you'd like. Swiftly whip in the sour cream, making tight fast motions with a spoon as if you were beating an egg. That's it! Serve this sauce over your meat and side dish.

Inspiration:
I have usually done deglazing with wine, beer, broth or juice and considered the pan sauce fundamentally French and fancy. Sour cream is a simple and homely ingredient from Russian cooking, where it is applied liberally to sauces, soups, salads and pancakes alike (just see our Beef Stroganoff, Beef and Mushrooms Stew and Classic Russian Borscht). Though French and Russian culinary traditions shy away from each other, this simple experiment worked out and so I will be on the lookout for more :)


My very Swiss kitchen (see my very loyal pan on the window sill).

A blanket is all the furniture I've got!

Carrot Relish

Tuesday, April 3, 2012

There are people who don't like cooked carrots, my beloved husband included. But even he absolutely loves this carrot relish. He loves it so much that he always offers his muscle power to grate carrots which I hate to do myself, just to convince me to cook it. After his generous labor input the kitchen looks a little messy, but that's OK.:)
This carrot relish is very versatile. It can be used in sandwiches or on toasts, as a perfect side for meat and fish, could be added to otherwise pale soups or just eaten as is.
The combination of vegetables and just a few spices makes a difference between bland and delicious in this simple recipe.
What you need:
5 large carrots, coarsely grated (about 2 lb)
2 large yellow onions, chopped
Cloves of 1 garlic bulb, peeled and finely chopped or sliced
1 1/4 tsp Kosher salt
1/4 tsp ground black pepper
20-30 black pepper corns
3-4 bay leaves
4 tsp white vinegar
4-5 Tbsp olive oil
Water
Large stainless steel or non-stick skillet/pan with tall sides
Total time 1.5 hours

Method:
Heat the skillet on medium heat, add oil and carrots. Saute for about 5-10 minutes.
Add onions, garlic, salt, peppers, saute 5-10 minutes. By that time all juices will evaporate, so add water little by little (about 2 Tbsp at a time) to prevent sticking to the bottom of the skillet. Reduce heat to low and stew for about 15 minutes. Add vinegar and bay leaves, continue to stew for some time adding water if necessary. The relish must be moist and all vegetables must be well cooked through. Vegetables will reduce in volume, so don't be disappointed by the yield.  Taste your relish, be flexible and add more spices to your liking.
The balance of spices for this recipe seem perfect to me, but you can feel otherwise, so be creative.

Before serving remove all bay leaves and all or most of pepper corns. Serve warm as a side and cooled as a spread on toasts and sandwiches.

Notes:
This carrot relish could be stored in the fridge for a few days - white vinegar works as a natural preservative. Just transfer it to a clean and dry glass/porcelain jar and cover tightly.
If you are experienced with pickling, the carrot relish can be sterilized in glass jars for longer storage. That's what we did back in Russia on those days when grocery stores were near to empty. To liven up long Siberian winters, we always had a few choices of  vegetable preserves, where the only preservative used was white vinegar.

Now I have to figure out how to make him love broccoli. :)