Our website has moved! Redirecting to RecipeStudio.com...
If this does not work, please click here.

Pink Summer Salad
with Gooseberries and Mozarella

Saturday, August 18, 2012


It's Saturday, it's summer and the sun is shining in Zurich. Because I live alone these days, I hardly ever cook anything interesting (except for parties, when things get too hectic to make pictures). When I do cook, my most favorite thing to cook for just myself is a salad. I become a painter who works with tastes, smells, textures and bright colors of the summer produce.

Today I fixed myself a salad before heading out to town, and it was so delightful that I have to share it before I forget.
What you need (serves 1):
for dressing:
1/4 tsp walnut oil
1 tsp olive oil
1 tsp balsamic vinegar, high grade
1/4 tsp Jaegermeister (yep, that's right)

for salad:
1 finely chopped scallion
a drizzle of freshly squeezed lemon juice
a sprinkle of hot hungarian paprika
~10 ripe red gooseberries
1/2 of a ripe turkish or mission fig
1/2 ball of mozzarella di bufala
a handfull of lamb's lettuce (other kinds will do)
a drizzle of Himalayan salt

How to do it:
Finely chop the scallion, drizzle with lemon juice and paprika, squeeze with your hands and let it sit on your chopping board for a couple of minutes.

Make the dressing in a little cup and mix it well.
Arrange the salad leaves on the plate, put halved gooseberries and chopped scallions on top. Pour most of the dressing over the arrangement, reserving a little. Gently mix the dressing with the leaves and berries using your hands until every leaf is dressed for a party. Arrange slices mozzarella and fig beautifully over the leaves. Sprinkle with the remaining dressing and bit of ground himalayan salt to taste.

Then, sit outside in the sun and relish the tartness, creaminess and sweetness of summer.

Baked Apples with Dandelion Honey Cream

Tuesday, May 22, 2012


This simple dessert of baked apples topped with buttery crumbles and sweetened sour cream is one of those treats that you cook on the days when you hm... don't want to cook. It was one of those days for me:  after digging and planting in the garden I was not inclined to cook at all (got too carried away this year with gardening projects).  This dessert  is simple and easy to do, but it can satisfy your sweet tooth and calm you down. I needed this badly on last weekend since Alex was away, and I usually feel uneasy on those days.

It took me about two weeks to make dandelion honey. Opposite to most of the neighborhood, we consider dandelions a blessing not just an invasive weed, so we let them be and brighten the lawn with their sunny faces. I picked up some dandelion blooms around the house and poured buckwheat honey on them to barely cover in a glass jar. Shaking the jar daily, I waited until honey blended with flower juice and acquired the pleasant grassy flavor. After two weeks it was infused with dandelion juice and pollen, and ready to enjoy. This time it was used to sweeten sour cream for a quick creamy topping.  We often use sour cream whipped with sugar in desserts, and sour cream is always in my fridge. Substituting honey for sugar seemed like a good idea, especially if it was an unusual honey like the one I had. The rest was quick and easy.
What you need:
2 Granny Smith apples, peeled, cored and cut in small pieces
1/4 cup sugar
2 tbsp butter, softened + butter to grease the pan
6-7 Tbsp flour
Pinch of baking soda
Ground cinnamon
1/2 cup sour cream (not reduced fat)
2-3 Tbsp honey (dandelion honey or sugar)
Time: 1 hour
Makes 2 nice portions

Method:
The apples:
1. Grease baking dish with about 1/2 Tbsp butter.
2. Rub 2 Tbsp butter, flour and baking soda until crumbly and well incorporated.
3. Put apples in the dish, sprinkle with about 1/8 cup of sugar.
4. Sprinkle apples with butter crumble and the remaining sugar.
5. Bake at 365 F for about 40 minutes or until apples are soft and cooked through.
6. Set the oven on grill setting to add color (watch closely!)
7. Take out of the oven and give it a few dashes of ground cinnamon while hot.

The cream:
If you don't have dandelion honey, the regular honey will do, even sugar, for a simpler version.
Beat 1/2 cup cold sour cream with 2-3 Tbsp honey(dandelion honey or sugar) until creamy (sour cream should thicken a little). Chill for 15 minutes. For these quantities a mug and a tea spoon (and your hands, of course!)work best as tools to whip the sour cream.

Serve your baked apples warm or cold with chilled honey cream atop.

This simple dessert lulled me and minimized the feeling of loneliness. It stifled my fears, and let a positive mood and appreciation of solitude settle in.

Notes:
This portion of baked apples could be stretched for 4 people, if you serve it in smaller bowls or saucers. It can also be your emergency dessert in case you happen to have an unexpected avalanche of guests. To make it fancier, use whipped cream or ice cream  in lieu of sour cream and honey.

Strawberry Tart with Ginger and Lemon

Wednesday, May 16, 2012


Strawberries sitting in my fridge were meant to accompany the ice cream, but it seemed too simple for the Mother's Day weekend. So I changed my mind and made this strawberry tart for all mothers of the world, including yours truly. There was no time to search for a crust recipe, so I took it from my mind using previous experiences. The recipe for the custard was taken from my old baking book, the rest came in place by itself.
Oh those spring weekends! Holiday or no holiday, you have to work outside: cleaning, pruning, planting, watering, and what not. The process obviously has no end, so you have to stop at some point before you drop dead under a rhododendron bush.
I figured it'd take me not more than one hour to make the tart, so I left it to after dinner. Big mistake number one. When the dough was made (after a significant 10-minute effort) I could do nothing but take a horizontal position on my bed. I tossed the dough into the freezer for 30 minutes and decided just to relax during this time. Big mistake number two. I drifted away into irresistible sleep and woke up to realize I slept for two hours! Two hours that felt like 20 minutes! The dough was stiff-frozen, and it took a long time to thaw it. So the dessert that I planned for Sunday evening became my next day's breakfast. Not how it was planned, but with coffee it was a very nice beginning of the day. So all is well that ends well, but still it's probably not a good idea to combine elaborate yard work with creative kitchen endeavors.

What you need:
For the dough:
1 1/4 cup flour, sifted
1 stick butter, softened
1 Tbsp white vinegar
1 Tbsp vodka
1 egg
Pinch of salt

For the custard:
3 eggs
1 cup half & half
3 Tbsp sugar
1 tsp corn starch (or potato starch)
1 slice of caramelized ginger, finely diced

For the filling:
1 lb fresh strawberries
1/2 grated lemon + 1/4 cup sugar (or lemon curd or marmalade)
Meyer lemon (or regular lemon) zest

9" baking dish

Total time: 1.5 hours
Makes 12 wedges

Method:
Rinse strawberries and spread them on a few layers of paper towels to dry. Finely grate lemon (discard all seeds) and mix it with sugar (or separate about 2 Tbsp of marmalade or lemon curd).

Prepare the dough:
1. Mix egg, vinegar, vodka, and salt - these are wet ingredients of your dough.
2. Cut butter in 1/2" pieces. Rub butter and flour between your fingers until crumbly.
3. Mix in the egg liquid gradually, using a wooden spoon.
4. Finish with hands: form a ball, flatten it, dust with flour, and put in the freezer for 30 minutes.

While the dough is in the freezer, prepare the custard:
1. Beat eggs and sugar, mix in starch and half & half.
2. Using a double boiler or two pots (where the bigger is filled with water), bring the mixture to steam until thickened constantly stirring with a spatula.
Instead of a double-boiler I use two pots (or a deep pans).
3. Mix in ginger, remove from heat to cool. Stir from time to time to avoid the film forming on the surface.

While the custard is cooling, bake the crust:
1. Roll the dough out into a disc that is about 2.5" bigger than the diameter of your baking dish. I used a 11" plate as a template and cut it a little bigger than the plate (the dough will shrink a little while baking). It fit perfectly into a 9" dish.
2. Press into the baking dish, cut off the excess dough, pierce in a few places with the tip of a knife (or a fork). Bake at 390 F for about 20 minutes or until slightly browned.

While the crust is baking prepare the strawberries:
1. Dry strawberries with paper towels if not already dry.
2. Cut of the ends, then cut each berry in half.
3. Place berries cut side on paper towel to absorb some juice.
4. Separate about 2 Tbsp of lemon syrup  (put the grated lemon through the sieve). If you use marmalade, warm it up for easy brushing.
5. Brush each berry with syrup.

When the crust is slightly browned, gently slide it out of the baking dish on a  rack  to cool. Also at this point put the custard in the fridge to chill (cover with plastic wrap to avoid the film on the surface).
Now the fun part - putting the tart together.
When the crust reaches room temperature, put your tart together:
1. Spread the custard in the crust.
2. Place strawberries in swirl or radial order.
3. Sprinkle with lemon zest.

Serve right away! That is how this strawberry tart should be eaten. If you do it in advance the strawberries will start to release the juice and the custard will moisten the crust, and the whole thing will not be as good.
Tea with milk is a nice accompaniment to this dessert. The crust was crumbly, the creamy custard moderately sweet, and hints of lemon and ginger worked perfectly well together.
Just made and begging to be eaten. :)
Notes:
I made a thicker crust, but if you prefer a thinner one, you can make two crusts out of this dough. To make it you have to form two balls of dough before putting it to the freezer, and don't forget to take both out after 30 minutes.
Alcohol will evaporate during baking - no worry about this.

Goat Soup with Dumplings

Thursday, May 10, 2012


I didn't know what the goat meat tastes like until I made a refreshing Saturday morning trip to Blood Farm in West Groton, MA, and cooked the goat meat soup for the first time in my life. I was hoping to get fresh meat, but it was frozen, I should have asked to keep it fresh for me in advance. Who knew? Next time I will. This place was kindly revealed to me by the hosts of Inn at the Cross Roads blog, and I am ever so grateful for that. Now I know yet another place to get good local food.

When the meat was thawed, it smelled so fresh, like the meat we used to buy at an open farmers market in Russia where merchants brought it fresh from the countryside. Contrary to what I expected, the meat didn't have a strong smell as mutton/lamb would, and it was very lean (only a small 1" blob of white fat was floating on the surface of the broth), even young lamb is usually much more fatty. So I had to change the recipe that I had in mind, to go well with goat meat.

I used parts of meat with bones, necessary for a good broth. The broth was simmering for a long time to acquire a concentrated aroma similar to beef (or maybe veal) and a beautiful amber color (the unpeeled onion contributed to this). It's better to make the broth the day before, in the evening when you just have to check once in a while and do other things. A good broth is your guarantee for a good soup! That's what I did, and the next day the soup was made, rich with most tender meat I've ever tried.
What you need:
This soup (and my trip to the Blood Farm) was inspired by the post from Inn at the Crossroads blog.

1 1/4 lb goat meat with bones
8-10 cups of filtered water
1 yellow onion, whole with peel(for the broth)
1 bay leaf
10 black pepper corns
1 small carrot, grated
1 Italian pepper (or 1/2 yellow bell pepper), diced
1 yellow onion, diced
 4 cloves garlic, sliced
1 medium tomato, peeled and diced
2 Tbsp butter
1/2 tsp ground ginger
1/4 tsp ground coriander
Pinch of cumin
Ground cayenne pepper to taste
Salt to taste
1 egg
2 Tbsp water
7-8 Tbsp flour
Chopped parsley and chives to garnish

Cooking time (broth): about 3.5 hours or until meat is almost falling off the bones
Cooking time (soup): 30 minutes
Feeds 4 people


Method:
Cook the broth the day before you plan to make the soup.
I didn't ask, but looks like shoulder parts.
Rinse the meat, barely cover with filtered water, bring to boil. When you see a lot of foam, discard the water, rinse meat again with cold water, rinse the pot, put meat back in the pot, cover with 6-8 cups of filtered water and put back on heat. I adopted this method from my Jewish friend Larisa, it allows you to make the clearest perfect broth.

When it starts to boil again, reduce heat to simmer, skim the remaining foam, add unpeeled (but rinsed and checked for quality) onion, black pepper corns. Continue to simmer for about one hour, then add salt to taste and continue simmering. If a lot of water evaporates add some more boiling water. When the meat is almost done, add a bay leaf. Cook until meat is falling off the bones. That's where I stopped the day before.

The next day, warm up your broth, fish out all meat and bones, set aside. Pour the broth in another pot through a fine sieve to get rid of possible bone chips. Now you are ready to make your soup.

1. Saute onion and carrot in butter until caramelized. At the end add garlic, switch off the heat,and let it sweat for some time.

2. Put the broth on high heat, prepare the batter for the dumplings. Rapidly mix flour, egg and water in a bowl (a small mug works best) until even (takes 2 minutes or less). When the water starts boiling, scoop about 1/2 tea spoon of batter and dump it in boiling broth. This way scoop out all your batter.

3. Reduce the heat to medium, add peppers and tomato to the soup, let it simmer for 5 minutes.

4. Add sauteed carrots with onion and garlic, and spices, let simmer for another 5 minutes or so.

5. Finger through the meat and remove all bones, tear or cut meat into 1" pieces.

6. Add meat to the soup. At this point I also tossed in some chopped Italian parsley. Check for salt, add more if desired, remove from the heat, let brew for 5-10 minutes.

7. Meanwhile prepare garlicky toasts from rye bread (or any bread you can have with soup). Peel one big clove of garlic, cut it across, rub on the edges of hot toasts, sprinkle with coarse salt (sea salt would be best of course).

When serving, add more chopped parsley, chives and any greens you like. Though not what I had pictured in my mind, the goat soup with dumplings was very tasty, it was what you would call a hearty meal, and the meat was literally melting in your mouth. This is a perfect soup for dieters and people suffering from fat phobia. :) We don't have it, but still enjoyed our goat soup with dumplings to the last spoon.

Notes:
If you have nowhere to go for goat meat, no worry. Lamb will do too, just make sure to buy meat with bones. Cook the broth the day before, chill overnight. In the morning you can collect and discard all solidified fat from the surface of the broth if you wish. To me, throwing this fat away is a waste of a valuable product, I would use it to saute vegetables for the soup.

Health Nut's Raw Vegetable Relish

Tuesday, May 8, 2012

Consuming sinful Parisian pastries on my latest trip drew my mind to healthier things - fresh vegetables, spring herbs, vitamins, the stuff of life. Today's recipe is for an ultra healthy relish of carrots, tomatoes, peppers and rhubarb marinated cold in the juice of one whole lemon and a few other flavors. This spicy, zesty and crunchy concoction is chock full of vitamins that will ward off any lurking cold. The strong flavor is a perfect complement to red meat, beer and cheese.

Ready for a burst of energy?

What you need:
Oops... forgot the tomatoes
Here they are!
2 yellow carrots
1 regular carrot
1 parsnip
1 ramiro pepper
1 stalk rhubarb
6 small dark brown tomatoes (or green tomatoes, or any other tougher kind of tomato)
1 shallot

for the marinade:
1 cup very strong black tea
6 Tbsp apple vinegar
juice and zest of 1 lemon
3 Tbsp vodka
3/4 cups soy sauce
1 clove garlic, shredded
1.5 tsp sugar

How to do it:
Combine marinade ingredients in a separate bowl (do not heat the marinade!). Chop all the vegetables (and rhubarb, which is not a vegetable) and douse them with the marinade. Cover with a plate (e.g. see mom's instructions for pickled cucumbers) and let stand for 24 hours, in the fridge or at room temperature.

The art spirit:
There are two interesting points about this relish recipe.

Number one - the ingredients are unusual. Rhubarb is most commonly used in desserts, but its fresh sourness works very well among the vegetables. Ramiro peppers are extremely flavorful and sweet, and I have not seen them in supermarkets when I lived in US. Dark brown tomatoes are also not common. Parsnip has a strong flavor of its own, and yellow carrots just have a nice happy color. If you do not have these ingredients - get inspired at your own grocery store! There are infinite combinations of healthy vegetables to choose from.

Number two is the marinade. For starters, it has a lot more vitamin C than your usual vinegar-based marinade. To make life more interesting, it also has caffeine and a little bit of alcohol. I had some of this for dinner today and I don't know what to do with my energy. I assembled a couch, a table, cleaned up a room and got over a cold that was just about to start from biking in the rain along Lake Zurich this past weekend.

Local color:
Finally, if you are lucky, you may be able to garnish this dish with a few blooms of bear's garlic (also known as ramsons, wild garlic and wood garlic). A co-worker of mine (thank you, Stefan!) mentioned that the mountains around Zurich have a lot of Bärlauch this time of year. After a quick look at wikipedia, I learned that Bärlauch is nothing but the beloved wild garlic (черемша in Russian, pronounced cheremsha) that we deemed forever lost after moving to US from Siberia. Bear's garlic has a distinct taste that I cannot pin down - you will just have to try it yourself! It tastes of woodland, childhood, of long journeys and of healthy hunger.

If Stefan had not told me, I would not know to pick up a few of the white flowers scattered around Zurich. They are everywhere and this is what they look like (also pictured in the first photo):
Wild garlic in May around lake Zurich.

A few more photos from my trip around the lake (well, half way around... as it started to rain pretty hard):

The orderly Swiss love graffiti, paradoxically.

Lake Zurich, overcast and beautiful.

Napoleon Cake

Thursday, May 3, 2012

Layered Napoleon cake is our family's heirloom recipe. The number one cake. It can also be called mama's signature cake. Nobody she shared this recipe with could reproduce what she did. Luckily I wrote it down in my recipe notebook some thirty years ago. I made it a few times, but it was never like mama's, until now.

This is not a traditional Napoleon, or Mille-feuille recipe. The dough is a puff pastry, but not a traditional multi layered type either. The crème that was used between layers is a combination of pastry cream and simple butter cream.  Mama also added grated lemon to the middle layer to make it even fancier than it was. The dough was always airy and flaky, maybe because she added vodka to it. This always made people seeking the recipe rise their brows.

Actually, when I was little, there was no name for this cake, we called it just "Chopped Cake" (Rubleny Tort), but others called it "Napoleon". Later I made it for our English class graduation party, and my classmates called it "Snow White" (Belosnezhka). So many things are linked to this cake, so many memories. It was lovingly made for family festivities and was always a great success with all our guests, and never was there enough of it. As soon as the last piece was gone, you wanted some more. It took time to make it, and I liked to participate, watching, mixing, spreading cream, and certainly licking dishes.

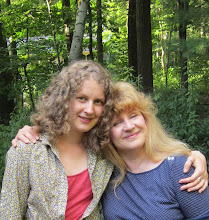
I made today's cake for Alex's birthday. I was making it for him but thinking about mama since it was also the day she died. The cake turned out exceptionally good, and I couldn't help but wonder if mama's spirit was present to help me (actually I was even talking to her while making the cake and recalling some tricks she taught me). Can it be true? I think it can.

This time it took a lot of time because I had to constantly stop to make pictures of all the stages. It distracted me a little, but nevertheless I channeled most of my energy and concentration into the cake. Once and again, it was a labor of love, love for my other half. It was Alex who brought us to a foreign country and made it possible to go through the turmoils of immigration. Once, in a moment of weakness he said: I feel like a poor little kitten. But the kitten was brave enough to overcome uncertainty and the language barrier, and bring us where we are now. So I made this cake for my little kitten who grew into a mountain lion. Happy Birthday, dear, and Many Happy Returns of the Day!


What you need:
The recipe in my shabby old  notebook looks like this, it has almost no instructions:
I wanted to make it possible for you to repeat what I did with the same worthy result, hence the detailed instructions. Who knows, maybe this cake will become your favorite, too, and your children will remember it as the best cake of their childhood.
So, that's what you will need...

For the dough:
3 sticks + 1 Tbsp cold butter (350 g)
4 1/2 cups flour, sifted
Egg mix: 1 egg, 1 yolk, 1 1/2 Tbsp vodka, 1 1/2 Tbsp white vinegar, pinch of salt, water to yield 1 1/3 cup of liquid

For the crème/custard:
2 eggs
2 yolks
1 1/4 cup sugar
1 cup milk
1/4 cup half & half
1 tsp vanilla extract (optional)
3 sticks softened butter (340g)

For the lemon spread:
1 whole lemon, finely grated
3/4 cup sugar

Total time: 3.5 hours (if you have experience)
You can make as many as 30 servings (depending on the size of a piece)


Method:
1. Prepare egg mixture: mix egg, yolk, salt, vodka, vinegar, and water. You should have 1 1/3 cup of liquid (alcohol will evaporate during baking).
2. With a big knife or a dough blender chop cold butter and 3 cups of flour to a small crumble. Add the rest of flour, continue to chop until there are no noticeably large crumbles. Use a board to do all this, and try not to use your hands to collect the crumbles that fall from the board to your counter, do it with the knife.


3. When you achieve a fine crumble, start adding 2-3 Tbsp egg mixture to the dough and continue to chop, working the liquid into the dough. Continue adding liquid and chopping until the dough starts to come together.


Now bring it all together with hands.

4. Form a log of dough with your hands, cut it into 6 parts. Roll each part in flour, place on a board and put in the freezer for 30 minutes, then transfer to a lower part of the fridge for 30 minutes more.
If you want a round cake, make pieces round.
5. While the dough is being chilled, prepare the  crème. Beat eggs, yolks and sugar until they acquire a light yellow color and the sugar is almost dissolved. Add milk, half & half, mix well. The best would be to have a double boiler. If you have no double boiler, like me, use a bigger pan with water and place your egg mixture there in a smaller pan.
Put on medium heat. Heat up the mixture, constantly stirring until it starts to steam and becomes thicker. At this point I put it on direct heat and wait (while stirring) for the first bubbles to appear, then immediately set aside. Let it cool, stirring occasionally to avoid the film to form on the surface.
In a bowl beat butter until creamy. When the egg mixture has cooled down to room temperature (or even a tad higher), start stirring it into butter in small portions of 2 Tbsp at a time. Each time mix until even. Stir steadily at a pace of about 2 stirs per second (don't worry, you don't need a metronome for this:), do not beat or the butter might curdle. If it happens, place the bowl in a dish with warm water and stir gently until even).
If the butter has a yellow film, scrape it off with a knife
and discard.

My double-boiler. :)


Good  crème must be smooth and shiny.
6. Set oven at 400 F. Take out one piece of dough, put it on a "floured" surface, flatten it somewhat with the palm of your hand (this will also warm it up a little), then roll as thin as you can, gradually increasing pressure. Constantly turn it on the floured surface to avoid sticking and to help the dough spread. The dough should be as thin as 1/8".
I used a paper template to cut each layer, it was 10.5"x12.5" rectangle. If you want a round cake, make a round template. You can make it any form you like! Keep in mind that layers will shrink a little while baking, so cut them about 1/3" bigger than the template. After each cutting I had some leftover dough that I put back in the fridge. So by the end I collected enough dough for the seventh layer and for finishing crumbs on top of the cake.

7. Line the surface with kitchen towels and paper towels to receive baked layers. Place a cut out layer of dough on a cold ungreased baking sheet, pierce it with a fork in a few places. Bake for about 7 minutes or until just barely browned. While the first layer is baking start to roll out the next one.

8. Carefully slide the first baked layer on the prepared surface to cool. Rinse the baking sheet with cool water, dry with paper towels, and bake the next layer. Repeat with all layers. If you have a few baking sheets, it will shorten your baking time. Finally, bake the leftover dough, also thinly rolled out.

9. Stack baked layers to cool completely, prepare a serving dish where you will put your cake together.

10. Finely grate a whole lemon, discard all seeds. Mix with sugar. This will go to the middle layer.

11. Choose the most even baked layer - it will go on top, set it aside. Dab the surface of the serving dish with crème, so that the first layer sticks to it and doesn't wiggle. Now choose the worst layer and put it on the dish bubbled side up. Press it with your hands to break and flatten the bubbles. Scoop the crème in 1 tsp portions on top, spread with a butter knife or a spoon, you will use about 9 tsp per layer. Repeat with two more layers. This dough is fragile and can easily break, but this can be corrected while spreading the crème - just put pieces together as a puzzle and "glue" them to the previous layer.


12. The forth layer has no butter  crème on it, just grated lemon and sugar. Spread it evenly and avoid dripping on sides.

13. Put next two layers with crème. The last (and best) seventh layer is placed bottom side up (it is more even). Spread butter crème on top and sides, fill in the gaps between layers. Work in small portions.

14. Break the baked leftover dough into small crumbs, sprinkle over the top of your cake. You can also sprinkle the sides if you want. The top could be dusted with confectioner's sugar, but this is optional.
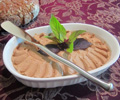
Who can resist licking the dish?..

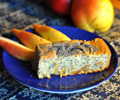
Chill the cake for 2-3 hours. Serve! With tea or coffee, or just like that. ...and thoroughly enjoy your Napoleon Cake Russian style. Gorgeously decadent and absolutely delightful...

Art:
You can get creative and make some pattern on top of the cake. I cut out a kitten head and two paw prints, placed them on top using tweezers, and dusted with confectioner's sugar through a fine little sieve. Then I carefully removed paper pieces, with  tweezers again. On this cake it's not so visible, but I needed just a hint of a kitten. Usually we didn't decorate the top at all - it is as good as it is with just crumbles.

Baked Omelet (Drachona)

Sunday, April 22, 2012

I loved baked omelet that was served in Russian canteens, the common lunch place of the Soviet era. It was one of very few eatable and even enjoyable dishes among an array of unattractive food. They used to make it on huge baking trays and cut off the portions with a special spatula. It was browned on the top and was  not losing the volume once on a plate, as usually happens with top-stove omelets. We called it omelet, and at that time I didn't know it had a special name drachona.  The name probably comes from either Ukranian or Belorussian cuisines. That's what my linguistic intuition tells me since I failed to find any proof of origin for this word. The research shows that basic drachona is made of eggs, flour and milk, it is oven-baked. But there are also numerous variations when it is made with wheat or millet, potatoes and even cheese.
When I found the recipe online and decided to cook, I forgot to separate eggs and my drachona, though deliciously puffy right out of the oven, quickly and disappointingly decreased in volume on our plates. My second attempt was successful (I tried to wake up completely and concentrate :): drachona increased in volume nicely and did not sink - it was holding until the last bite. The texture was light and delicate and would fit for a dessert pudding, but it was not. It was our unusual and very pleasant Sunday breakfast.

The recipe was adapted from RusCuisine.com.

What you need:
4 large eggs, separated
1/2 cup milk
2 Tbsp sour cream
2 Tbsp flour
1/4 tsp Kosher salt
1 Tbsp butter + more for serving
Chopped parsley

Time: 50 minutes
Feeds 2-4 people

Method:
Set the oven at 325 F then start prep work.
1. Beat egg yolks with salt and sour cream.
2. Mix flour and milk until even.
3. Beat egg whites until soft peaks form.
4. Mix well 1 & 2, then fold in the whites, don't beat after that.
5. Grease the baking form with 1 Tbsp butter.
6. Pour in the mixture and place in the heated oven.
7. Bake for about 30-35 minutes or until set. You can broil it a little if you want if you want it browned.
Egg yolks and whites separated in two layers while baking,
 but it didn't change the taste to the worse. 
Serve drachona immediately with more butter and chopped parsley.

Notes:
I don't get tired to repeat: people, please use organic eggs from free range chickens - it makes the whole difference in your omelets. Please support your local farmers that sell fresh clean eggs!
Blue eggs from a nearby farm - the base for my drachona. So good... :)
Experiment with your baked omelet by adding more spices, bacon, green onions and other things your imagination will whisper.

Hot Non-Alcoholic Fruit Punch

Tuesday, April 17, 2012

As soon as I came to Zürich two weeks ago the weather turned foul and hasn't even once cleared up (until today, yay!). It was also cold, and being optimistic about spring I didn't pack anything warm enough.

Under these circumstances one can't go on drinking mulled wine every day (next fall I promise to post our amazing mulled wine recipe and you will understand why it may be tempting). This spiced hot fruit punch is a non-alcoholic alternative that warms the body and soul just as well. The recipe is a hybrid between our fragrant and sophisticated mulled wine recipe and Russian kompot, a dead simple boiled fruit drink I enjoyed growing up.

If it's still cold around your part of the world, this recipe is for you. And if not, you can also serve this cold.

What you need:
4 cups water
2-3 Tbsp sugar
1 Tbsp strawberry jam (optional)
1 apple
8 dried apricots
3 Tea bags of hibiscus tea
1 very fragrant fresh clementine
two pinches of mulling spices (choose any that you like, I just had a pre-packaged mix in my cuppoard)

How to do it:
Chop the bright orange apricots in half and drop them into a pot of water. Add sugar and hibiscus tea bags (careful to leave only he heat resistant parts of the teabags) and turn the heat on. Make sure the water boils only very gently - no wild gurgling bubbles, please.

After a minute or two of boiling, the tea bags will have released all of their crimson color. Fish them out and discard. We would not want them to break and let loose their contents. Add one pinch of mulling spices and cover.

After 20 minutes of gentle boiling, add chopped apple and the second pinch of spices. Stir in strawberry jam and cover.

When the apple chunks are cooked through (5-10 minutes), remove from heat. Add clementine zest and juice to the hot (but not boiling!) punch right before serving.

Enjoy the drink and the fruit and stay warm!

The art of it:
I used dried apricots and an apple, because my grandma had used them in winter when no fresh fruit was available. To me this combination tastes of home and childhood. Maybe for you something else will do the trick: raisins, plums, pears, you name it! Just be sure to take into account how long it takes to cook different fruits.

The type of mulling spice is up to you. It gives this drink a wintery feeling, while the clementine zest throws in a bit of freshness and feistiness. After all, Spring is coming.

Inspiration:
This weather will inspire anyone to warm up:

Though some of actually looks quite nice:


And to top it off, I actually have a bed now, and a table, and curtains (but still no internet, alas), unlike the last time I made a post!

Frikadellen Soup

Monday, April 16, 2012


My German Nanny was not a good cook, but it was she who introduced this simple Fricadellen soup recipe to our family. Too little to help, I used to hang around kitchen looking how she was grinding, peeling and boiling. "What's cooking?" I would ask. "Frikadellen soup", Nanny would grouch, she didn't like me in the kitchen. And suddenly I felt so terribly hungry, and time started to crawl so slowly until the soup was finally done...

Since then (long time ago it was :) it has become one of our frequently cooked and loved soups. Traditional German Fricadellen are relatives of Russian cotelettes and meatballs, both of which use the same ingredients and have similar form - but not cooking style. In today's recipe tiny Frikadellen are prepared in a different way. This soup is a healthier way of cooking ground meat, since it is boiled not fried.

The soup is simple, and the only special skill you need is rolling small meatballs out of ground meat. It takes some practice, but what doesn't? I think slicing and dicing takes more skill than this. I used beef, but other meats can be used with the same result, but it is best if the meat was not very lean - it makes the meatballs more delicate. Actually most of this fat will boil out and can be skimmed.

This soup is always a pleasure to eat, and everybody likes it (the reward every home chef needs).
What you need:
3 qts filtered water
1/2 lb ground meat (beef, pork, lamb, turkey, chicken or their combinations)
1 small egg
1 medium yellow onion, peeled
2 medium potatoes (starchy type), peeled and cubed (1/2" cubes)
1 tsp Kosher salt, divided
1/4 tsp ground black pepper
Black pepper corns
2 Tbsp flour
1 bay leaf
Chopped greens
Time: about 1 hour
Feeds 4-6  people

Method:
1. Put a pot with water on high heat.
2. Cut a small portion of onion and grate it in a bowl. Add ground meat with 1/4 tsp salt, ground pepper, and 1 small egg (if it's a large egg the meat mass can become too soft to form meatballs; if it happens, add 1 tsp flour). Mix with a spoon or your hand until well incorporated and not sticking to the bowl.
3. With a tea spoon scoop small portions of meat on a flat plate. Roll each portion between your palms to form a small meatball about 1" diameter. Use slightly wet hands to do this, if meat is sticky.
4. Roll each ball in flour, and shake off the excess by rolling it between palms. Working swiftly, repeat with all the remaining meatballs. Drop meatballs into boiling water (it should be boiling at this point). Reduce heat to medium, remove the foam from the surface. Slightly shake the pot to avoid the sticking of meatballs to the bottom. Boil for a minute and let the meat harden.
5. Add potatoes, 3/4 tsp salt (or less if you prefer less salty food), and black pepper corns, reduce heat to simmer.
6. While soup is cooking, chop the remaining onion and saute it in 1 Tbsp oil until nicely caramelized.
7. When potatoes are almost ready, add onion and bay leaf to the soup, taste for salt (you might use less or more of what is in the recipe). Keep in mind that potatoes absorb a lot of salt, so soup might seem salty, but at the end it will need some adjustment. Simmer until potatoes are completely done.

Serve with chopped greens of your choice. Enjoy!

Notes:
This soup can be called kid-friendly. As a child, I loved Fricadellen soup, so did Masha when she was little. She still loves it and has been asking me for a long time to post it (How long can you procrastinate with this recipe?.. :)
This is a basic recipe that you could "embellish" to your taste and mood of the day: add leek, carrot, sweet pepper, garlic, and what not.